-
Create a ticket from tickets for a free trial!
KmBox Net Guide
Single PC KMBoxNet with Avalon
This guide explains how to set up and use KMBoxNet with Avalon for optimal performance.
Hardware Setup
- Locate both blue cables provided with the KMBoxNet.
- Plug each of these cables into a USB port on your PC, as shown in the image below:
- Connect your mouse to the top-right USB port on the KMBoxNet device.
Software Configuration
- On your PC, open the Network Connections panel:
- Press
Win + Rto open the Run dialog. - Type
ncpa.cpland pressEnter.
- Press
- Locate the network device labeled USB2.0 Adapter (see example below):
- Right-click on the USB2.0 Adapter network device and select Properties.
Configuring IPv4 Settings
- In the Properties dialog, scroll to Internet Protocol Version 4 (TCP/IPv4) and select it.
- Click the Properties button.
- In the new dialog:
- Select Use the following IP address.
- Ensure that the first three ordinals of the IP address match those of the KMBoxNet device (e.g.,
192.168.2.). - Set the last ordinal to a random number (e.g.,
192.168.2.50). - Copy other settings as required from the KMBoxNet device.
- Click OK to save the changes.
Note: Ensure that the subnet mask and default gateway match those of the KMBoxNet device.
Testing the Setup
- Verify the connection by checking the KMBoxNet network status in the Network Connections panel.
- Launch Avalon and confirm that it recognizes the KMBoxNet device.
If you encounter issues, revisit the steps above to ensure all settings are configured correctly.
Final Steps
- Open Avalon and navigate to the KMBoxNet setup screen.
- Ensure the setup screen matches the example below:
- Input the IP Address, Port, and UUID from your KMBoxNet UI into the respective fields. Avoid using the placeholder values from the image.
- When connected, the interface should display a success message similar to the image below:
How to spoof Kmbox Net
- Your KMbox NET arrives with default factory-assigned VID and PID values. Altering these identifiers immediately after unboxing ensures the device remains undetected by security systems that monitor for unauthorized hardware.
- Google "Usb logview nirsoft" and click the first link
- Download and install "Usb Log View"
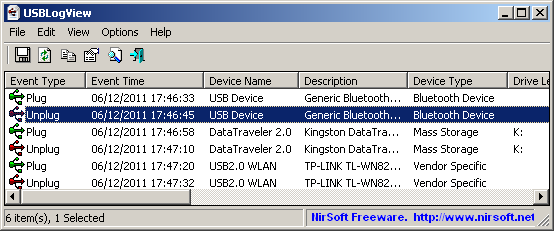
- Once you have Usb Log View open, unplug/plug in your mouse.
- When connected, it should show 4 new notifications double click the last in the list like in the picture below:
- Take your VendorID and your ProductID and combine them like this
- 25160101 - First the VendorID then your ProductID
- click on this link to download the KMbox NET tool.
- Unzip the file and open the .exe file inside the unzipped folder.
- Enter KMbox NET Details
- In the tool, input your KMbox NET’s IP, port, and UUID.
- Check the small ping box and click on the large button next to it.
- If a popup appears indicating a successful ping, you can proceed. If it doesn’t connect, try restarting the KMbox NET by unplugging it from your main PC and plugging it back in. You may also need to run the
exeas an administrator.
- Enter the VID and PID
- Enter the VID and PID you saved earlier on the left side of the tool.
- Click the button to spoof the values. A popup will confirm the spoofing is successful.
- Reconnect KMbox NET
- Go back to your main PC and open USB Log View again.
- Unplug and replug your KMbox NET. It should now display the same VID and PID as your mouse.
- Confirmation
- If the VID and PID match, you’ve successfully spoofed your KMbox NET.